Hello Everyone,
In my previous tutorial, I discussed How to deploy the Jenkins Server (Master) and Build server (Node/Slave) on EC2 Instances. Also, I mentioned that I will write how to build a Pipeline and deploy the application. So, this blog is a continuation of the previous tutorial. To read my previous tutorial click the link below
CI/CD Jenkins Pipeline With AWS - DevOps - Part 01
In this tutorial, I will show how to build Pipeline, Connect Github, and Continues Deployment of web application on Elastic Beanstalk.
Let's jump into the tutorial
How to build Pipeline, Connect Github, and Continues Deployment of web application on Elastic Beanstalk.
In this case, I am using GitHub as Version Control System and I going to build and deploy the Node-Js application on ElasticBeantalk.
1. Install NodeJs Plugins on Jenkins
Navigate to Manage Plugins and click on the Available tab. Then Search for NodesJs
Manage Jenkins > Plugin Manager > Install NodeJS plugin.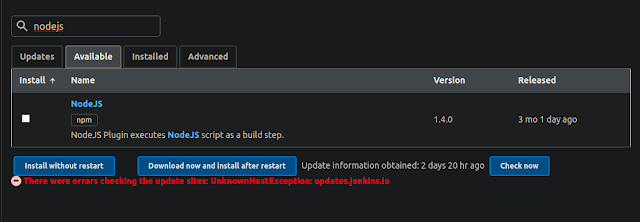
 Now the Plugin is successfully installed.
Now Goto the Global Configuration and Set your compatible node version.
Manage Jenkins > Global Tool Configuration > NodeJS
Bottom of your Global Tool Configuration, you can able to view nodejs installation tab.
Click On Add NodeJS and Configuration as follows, Name: NodeJs
 Version: NodeJs Application version install on your Jenkins slave #12.18.3
Global npm packages to install: npm install -g
Leave everything as default and click Save
2. Install GitHub Plugins
Note: I have installed GitHub Plugin on the post-installation the Jenkins. However, you can able to install plugins the same as above.
Manage Jenkins > Plugin Manager > Install GitHub
Once the GitHub Plugin is installed, connect your GitHub to Jenkins.
Note: We can connect our GitHub account in several ways. In my case, I am going to use an SSH key to connect my GitHub account. therefore I am going to Add Credentials to my Global configuration - Reason, my GitHub account is secured with 2FA.
Navigate to Manage Jenkins > Manage Credentials > Click Jenkins under "Stores scoped to Jenkins" Table > Global credentials (unrestricted).
Configuration as follows,
Kind: SSH Username with Private Key,
ID: GitHub,
Description: GitHub Credential,
Username: <your GitHub username>
Private Key > enter directly: Past your private key
Passphrase: <add a password if your key is secured with password>
3. Setup Jenkins Continuous integration for each activity in your GitHub Repository.
Now, we have configured the basics of Jenkins. Let's create a GitHub repository, push our code and then create a webhook to build our code on each change on our repository.
3.1. Create a Private GitHub repository
In most cases, enterprises use private repositories so that they can able to secure their repository from out-siders. let's practice our CI/CD with industry standards.
Note: I skip the repo creation since it does not involve technical stuff.
3.2. Create a webhook and add it to Jenkins.
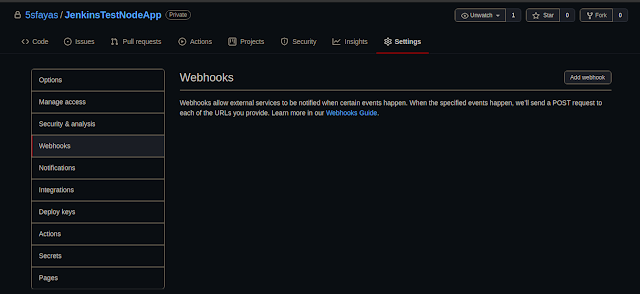
Once the GitHub Repository is created, Navigate to your repository and select setting > webhook > add webhook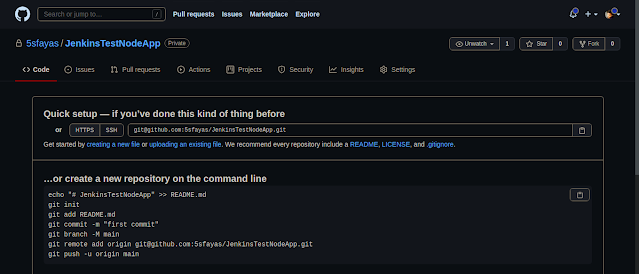
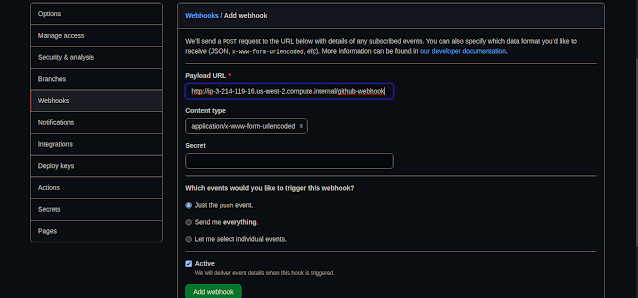 Payload URL: <paste your Jenkins environment URL/github-webhook/>.
 At the end of this URL add /github-webhook/.
Content type: ‘application/json’
Secret: leave the field empty.
On the page "Which events would you like to trigger this webhook?" choose "Let me select individual events." Then, check "Pull Requests" and "Pushes". At the end of this option, make sure that the "Active" option is checked and click on "Add webhook".
Note: Often organization manages their repositories by creating "New Organization" and from there, they create Repositories and Teams to work with a project. Then team members pull and push their code to the repository for new features, issues, and releases. This procedure allows the project manager to maintain and keep track of the project status.
Later in part 3 of this tutorial, I will talk in more detail about maintaining repository and release management to achieve Continuous Integration and Continuous Deployment.
Based on the above hook, I am setting up our Jenkins Continuous Integration whenever pull or push happened to our repository.
3.3. Push our code to the repository
I have already created my portfolio using react which is works as a static front-end web app. let's use it for our code. The code can be found here. download the repo and modify it as you like then push back to the repository that you have created earlier.
3.4. Setup Jenkins for Continuous Integration.
As we have discussed earlier, I am going to deploy the code to ElasticBeanstalk for each PULL and PUSH. Deploy on ElasticBeanstalk, we need to install AWSEB Deployment and AWS Elastic Beanstalk Publisher Plugins.
Navigate to Manage Jenkins > Pluging Manager > Available Tab > Hit Search Elastic Beanstalk > Click Install without restart.
This will install necessary module for post-build process.
Once the installation is done, let's set up AWS IAM credentials our Jenkins to deploy our application to AWS Elastic Beanstalk.Navigate to Manage Jenkins > Configure System > Scroll to Bottom > Deploy into AWS Elastic Beanstalk.
Once you entered the IAM credential, click save and create our first Jenkins job to build and deploy our application.
On your Jenkins DashBoard Click New Item > Enter a name for our project > Select Freestyle Project > Press Ok
Now the Project configuration is as follows, From the General Tab,
 Description: <your description>
GitHub project: <Select GitHub Project and Paste you Project URL>
Leave everything as empty
 Under Source Code Management
Select Git
Repository URL: <SSH URL>
Credentials: <The SSH GitHub credential which you have created earlier>
Note: I am Using GitHub credentials as SSH instead of Password or Token. you can select for your choice.
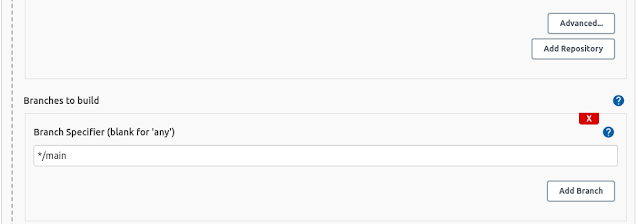 For this project, I am maintaining a master branch and main branch. The master in which where I test my code and later merge my master branch to main. The main branch act as the main/common branch for other branches such as the feature branch, todo branch, etc.
So, you can select the branch as per your SCM.
 I select GitHub hook trigger as build trigger. As we configured our GitHub to trigger Jenkins for each pull and push.
Under the Build section, select the AWS IAM credentials which you have added earlier for Elastic Beanstalk Application and Select region as per your choice.
Note: Please take a note of the region that will be used later in this tutorial to store our beanstalk application in S3.
 Application Name: <your choice>
Environment Names: <depend on your environment>
 Version Label Format
We deploy our application on changes to ElasticBeanstalk and AWS automatically creates versions for each deployment. This allows us to manage multiple versions of the same application and also we can roll back to the previous version if the latest version fails.
I am have configured my version label as <app name>-<commit id>-<build tag>
 As I mentioned earlier, ElasticBeanstalk stores different versions of the application to the S3 bucket. So let's configure applications for deploy to S3.
 S3 Bucket Name: <the bucket which to store>
S3 Key Prefix: <the object you want store application versions>
S3 Bucker Versions: <same as beanstalk region>
Leave everything as default and click Save.
Once the project is saved Jenkins automatically starts to build and deploy your application.
Now Navigate to your build history and click console output to check if the build is successful.
Viola! The Application is now deployed to the ElasticBeanstalk. Navigate AWS Beanstalk and check whether the application is deployed.
Click on the URL of the beanstalk application page and verify the application is deployed.
Now we have successfully deployed our portfolio to ElaticBeanstalk using Jenkins continuous integration.
This is a foundation of a simple CI/CD. While we are building and deploying the application to AWS, this solution is not production-ready.
I really want to talk much more in detail about CI/CD pipeline with code review, code quality, test, or security stages, and additional environment & test to ensure the artifact which fulfills all requirements before deploying to production.
In part 03, let's have contexts about the Source Control Management, Continuous Test, Release Management and App Performance and Monitoring (APM)
That's pretty much it for this tutorial. PEACE!
AWS
,
CI/CD
,
DevOps
,
Elastic Beanstalk
,
Jenkins

 Now the Plugin is successfully installed.

 Payload URL: <paste your Jenkins environment URL/github-webhook/>.
  For this project, I am maintaining a master branch and main branch. The master in which where I test my code and later merge my master branch to main. The main branch act as the main/common branch for other branches such as the feature branch, todo branch, etc.
 I select GitHub hook trigger as build trigger. As we configured our GitHub to trigger Jenkins for each pull and push.
 As I mentioned earlier, ElasticBeanstalk stores different versions of the application to the S3 bucket. So let's configure applications for deploy to S3.


No comments:
Post a Comment