Hello Everyone,
As you know, I am reading about AWS services and automate the deployment process of any AWS services using Terraform, Ansible, PowerShell, and bash and also often talk about DevOps.
DevOps is one of the things right now in the term of CI/CD with the development and release of software in the DevOps process. Every development and the release of the software have to be as fast as possible.
So, In this tutorial, show you how the deployment and release of a web application agile as possible using Jenkins, Github, AWS EC2 Instances, and AWS Elastic Beanstalk to create a deployment pipeline for a web application that is updated automatically every time you change your code.
This tutorial Divided into three parts,
In part 01, I will be explaining how to deploy the Jenkins server (master) and Build server (node/slave).
In part 02, I will explain meticulously how to build Pipeline, Connect Github, and Continues Deployment of web application on Elastic Beanstalk.
In part 03, let's have contexts about the Continuous Test, Release Management and App Performance and Monitoring (APM)
----------------------------------------------------------------------------------------------------------
How to deploy the Jenkins server (master) and Build server (node/slave) on EC2 Instances.
As we know, Jenkins is a continuous integration tool that pulls the latest code from the repository whenever there is a commitment made to the code to perform operations like build, test and run and produce test case reports. In a real-time environment, Jenkins also uses multiple slaves because there might be chances that require different test case suites to be run for different environments once the code commits are done.
By considering that in my mind, I am going to deploy Jenkins master (Master instance) to pull codes and slaves to perform build and test (Node instance).
The deployed Architecture as follows,
Note: In this tutorial, I won't be explaining VPC, Subnet, Route Table creation. This tutorial only about Jenkins Master/ Slave Installation & Configuration AWS Plattform.
Prerequisites,
1. Launch 2 EC2 instances under the same VPC/Subnets.
2. Name 1st instance as Jenkins Master and 2nd Instance as Jenkins Slave
Let's Dive into the Master/Slave Configurations.
1. Jenkins Master Instance Configuration.
SSH to your Master Instance and Switch to root user and install Jenkins.
Jenkins requires a Java runtime environment. Java packages are available in the system upstream repositories.
We will install OpenJDK 11 on the server.
Note: Hit the y key on your keyboard when asked before installation commences.
ubuntu@ip-10.0.0.172:~$ sudo -s
root@@ip-10.0.0.172:-# sudo amazon-linux-extras install java-openjdk11
...
Transaction Summary
======================================
Install  1 Package (+31 Dependent packages)

Total download size: 46 M
Installed size: 183 M
Is this ok [y/d/N]: y
root@@ip-10.0.0.172:~#
root@@ip-10.0.0.172:~#
Once installation is over, Confirm the installation by checking the Java version.
ubuntu@ip-10.0.0.172:~# java --version
openjdk 11.0.7 2020-04-14 LTS
OpenJDK Runtime Environment 18.9 (build 11.0.7+10-LTS)
OpenJDK 64-Bit Server VM 18.9 (build 11.0.7+10-LTS, mixed mode, sharing)
root@@ip-10.0.0.172:~#
Add Jenkins repository to Jenkins Master Instance. we’ll use the package installation method. Therefore a package repository is required to install Jenkins.
root@@ip-10.0.0.172:~# tee /etc/yum.repos.d/jenkins.repo<<EOF
[jenkins]
name=Jenkins
baseurl=http://pkg.jenkins.io/redhat
gpgcheck=0
EOF
Import GPG repository key.
root@@ip-10.0.0.172:~# rpm --import https://jenkins-ci.org/redhat/jenkins-ci.org.key
Update the list of repositories to confirm it is working.
root@@ip-10.0.0.172:~# sudo yum repolist
Install Jenkins Server
root@@ip-10.0.0.172:~# yum install jenkins
Start and enable the Jenkins service to start at the OS boot.
root@@ip-10.0.0.172:~# systemctl start jenkins
root@@ip-10.0.0.172:~# systemctl enable jenkins
root@@ip-10.0.0.172:~# systemctl status jenkins
● jenkins.service - LSB: Jenkins Automation Server
   Loaded: loaded (/etc/rc.d/init.d/jenkins; bad; vendor preset: disabled)
   Active: active (running) since Wed 2020-12-09 17:52:04 UTC; 9s ago
     Docs: man:systemd-sysv-generator(8)
  Process: 2911 ExecStart=/etc/rc.d/init.d/jenkins start (code=exited, status=0/SUCCESS)
   CGroup: /system.slice/jenkins.service
           └─2932 /etc/alternatives/java -Dcom.sun.akuma.Daemon=daemonized -Djava.awt.headless=true -DJENKINS_HOME=/var/lib/jenkins -jar /usr/lib/jenkins/jenki...

Dec 09 17:52:03 amazon-linux systemd[1]: Starting LSB: Jenkins Automation Server...
Dec 09 17:52:03 amazon-linux runuser[2916]: pam_unix(runuser:session): session opened for user jenkins by (uid=0)
Dec 09 17:52:04 amazon-linux jenkins[2911]: Starting Jenkins [  OK  ]
Dec 09 17:52:04 amazon-linux systemd[1]: Started LSB: Jenkins Automation Server.
By default Jenkins running on Port 8080. Confirm Jenkins Running on the Default port by executing the below command
root@@ip-10.0.0.172:~# ss -tunelp | grep 8080
tcp  LISTEN 0      50                                     *:8080              *:*          users:(("java",pid=2932,fd=139)) uid:996 ino:26048 sk:f v6only:0 <->
Everything is just done. But, Accessing the Jenkins console over port 8080 is kinda weird for me.
let's install NGINX as a reverse proxy to access our Jenkins Master over port 80 ( Like Normal browsing ).
root@@ip-10.0.0.172:~# yum install nginx
root@@ip-10.0.0.172:~# service nginx start
Configure /etc/nginx/conf.d/jenkins.conf file to set upstream group as jenkins application
root@@ip-10.0.0.172:~# vim /etc/ngnix/conf.d/jenkins.conf
upstream jenkins {
    server 127.0.0.1:8080;
}

server {
    listen      80 default;
    #server_name your_jenkins_site.com;#

    access_log  /var/log/nginx/jenkins.access.log;
    error_log   /var/log/nginx/jenkins.error.log;

    proxy_buffers 16 64k;
    proxy_buffer_size 128k;

    location / {
        proxy_pass  http://jenkins;
        proxy_next_upstream error timeout invalid_header http_500 http_502 http_503 http_504;
        proxy_redirect off;

        proxy_set_header    Host            $host;
        proxy_set_header    X-Real-IP       $remote_addr;
        proxy_set_header    X-Forwarded-For $proxy_add_x_forwarded_for;
        proxy_set_header    X-Forwarded-Proto http;
    }

}
Once you edit the configuration restart the Nginx
root@@ip-10.0.0.172:~# systemctl reload nginx
Now you can able to access the Jenkins server without defining port 8080 on your browser.
Access Jenkins Server
When you navigate to the Jenkins server you will be prompt to enter the Jenkins default password.
Jenkins default login password is store in this file: /var/lib/jenkins/secrets/initialAdminPassword
root@@ip-10.0.0.172:~# cat /var/lib/jenkins/secrets/initialAdminPassword
7c893b9829dd4ba08244ad77fae9fe4f
Configure Jenkins DashBoard
Once enter the Jenkins default password you will be prompt to configure the dashboard
Once the plugins are installed create the first admin user.
Click Start Using Jenkins and You will be redirected to the Jenkins Dashboard.
Now we have done with Jenkins installation successfully. Moreover, Jenkins provides an email notification service through which we can report the build status and testing results to the team.
Now let's configure to send Email Notifications in Jenkins.
Note: There are two ways to configure email notifications in Jenkins. Using Email Extension Plugin and the 2nd is Using Default Email Notifier.
I am gonna use the Default Email Notifier for this tutorial.
Since we are using AWS services for the Jenkins server, lets configure AWS SES Services to our email server.
Navigate to the SES services and click Email Addresses
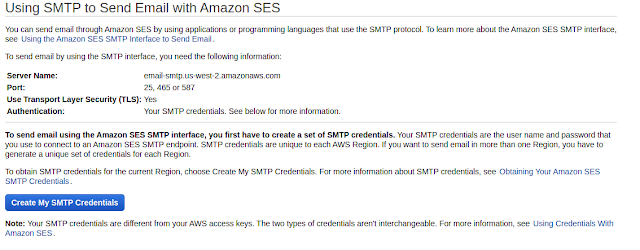
Fill in your email address and get verified, Then Navigate to SMTP Setting Make a note of your SMTP Server Name and Click Create My SMTP Credentials. 
Create My SMTP Credential page redirect to IAM Page and Click Create to get your SMTP Credentials for Jenkins Configuration.
Now Make of note your SMTP Credential and Go Back to your Jenkins Master Node and Configure SMTP for Email Notification under Jenkins configurations.
On the Jenkins URL Tab add your SES Email which you have configured
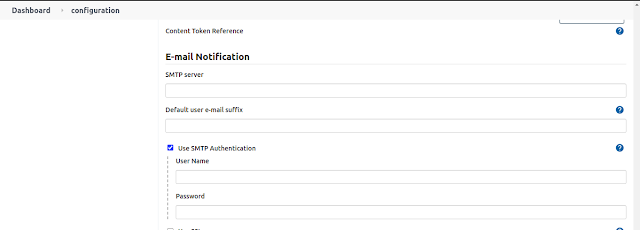
Scroll Down to bottom of the configuration page and fill in the SMTP Server and SMTP Authentication information
2. Jenkins Slave Instance Configuration
As we discussed above, the Slave Instance acts as a build server. Later in this tutorial (part 2) we will build and deploy the application on the elastic beanstalk. With that in mind, let's create IAM Role for the slave instance to Beanstalk full access.
Navigate to IAM and Click on Create Roles and Choose use case as EC2 and Attach Beanstalk full Acess policy.
Now Launch an instance with the role which you have created and configure security group inbound for SSH and only allow your Jenkins Master instance.
Note: Again I am not going to provide a tutorial for how to launch an instance and security group configuration. Please configure it yourself.
Disclaimer: To access your slave server from Jenkins master you need to add the private key of your slave instance to Jenkins master. Please take note of the SSH keys.
Go back to your Jenkins Master instance Configuration > Credentials > Global Credential (Unrestricted) Path and add the SSH private key
Now Start your Slave instance and install the following software. 1. Install Java
ubuntu@ip-10.0.0.168:~$ sudo -s
root@@ip-10.0.0.168:-# amazon-linux-extras install java-openjdk11
2. Install Git
root@@ip-10.0.0.168:-# yum -y install git
3. install elastic beanstalk CLI
root@@ip-10.0.0.168:-# /usr/bin/easy_install awsebcli
Once you have done with the installation, Take a note of the Slave instance private DNS and add this Slave instance to the Jenkins Master.
MyPrivateDNS: ip-10-0-0-168.us-west-2.compute.internal
Now go back to your Jenkins Master, Click Configuration > Manage Nodes and Cloud
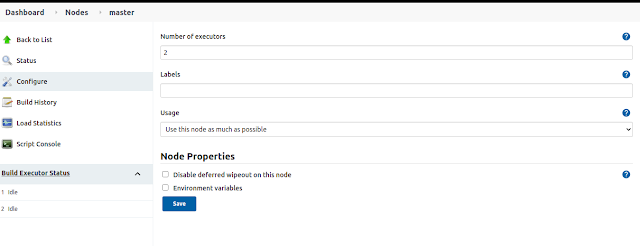
You will see the master on the node page. Click the setting button and set the Number of executors to 0. Meaning we are disabling our Jenkins Master to build any application. Because we have deployed slave instance to do build.
 Once you save it, Click on New Node and the Slave instance your worker node to build your application on the Continuous integration. and define the following fields on the menu.
Description: As you want
Remote Root Directory: Slave instance User's Directory, # /home/ec2-user
Usage: Use this node as much as possible
Launch method: Launch via SSH
Host: Your Private DNS, #ip-10-0-0-168.us-west-2.compute.internal
Credentials: Credentials that have created previously
Host Key Verification Strategy: non verifying verification strategy
Then click Save and you will be redirected to the Node page. On the page, you can able to view created node
Now click on the Node which you have created and click the Launch Agent button.
The Jenkins Master instance tries to connect your slave instance via ssh. You can able see the Log of the connectivity and on success will get a log that the agent has been launched.
Now you have successfully connected your Jenkins Slave Node with Master Node and you fully utilize your Slave node to build the application.
That's it for the CI/CD Jenkins Pipeline With AWS - DevOps - Part 01
In this blog, we have discussed how to deploy the Jenkins server (master) and Build server (node/slave).
I know it was a bit wild to configure back and forth. In the end, we have achieved our goal.
In part two, let's discuss how to build Pipeline, Connect Github, and Continues Deployment of web application on Elastic Beanstalk with the real-time example.
That's pretty much it, catch you guys in part two.

 Once you save it, Click on New Node and the Slave instance your worker node to build your application on the Continuous integration. and define the following fields on the menu.


No comments:
Post a Comment