Enable GZIP Compression for Web Container on Amazon ECS
The performance of the web apps plays a vital role in user experience and impacts their engagement. Though web apps need to be performant, as most of the time, they can be accessed on Desktop/Mobile devices short span of time.
Websitestes usually comprise static assets such as .js .css and .json text files. Enabling GZIP compression on web servers is one of the simplest and most efficient ways to achieve that. This helps to reduce the bandwidth requirement, speeding up the website rendering.
All modern browsers include support for GZIP compression by default. However, to serve the compressed resources to users with no hiccups, we must configure your server properly.
In this post, I will discuss how to compress AWS ECS-based Web Containers by implementing NGINX reverse proxy sidecar with the internet blazing fast.
Excited? Let’s decompress!
As you can refer to this architecture, Users request the Application Load Balancer, which then distributes the traffic to the NGINX reverse proxy sidecars. The NGINX reverse proxy then forwards the request to the application server and returns its response to the client via the load balancer.
With this network design, we can achieve compression by enabling GZIP as well as filtering unwanted traffic to the web applications.
NGINX configuration.
worker_processes  1;

events {
  worker_connections  1024;
}

http {

  gzip on;
  gzip_min_length 1000;
  gzip_proxied expired no-cache no-store private auth;
  gzip_types text/plain text/css application/json application/javascript application/x-javascript text/xml application/xml application/xml+rss text/javascript;

  upstream apps {
    server app-container:3000; # Same Name as App Container
  }

  server {
    listen 80;
    server_name  localhost;


    location / {
      proxy_pass         http://apps;
      proxy_http_version 1.1;
      proxy_set_header Upgrade $http_upgrade;
      proxy_set_header Connection 'upgrade';
      proxy_set_header Host $host;
      proxy_set_header X-Forwarded-For $proxy_add_x_forwarded_for;
      proxy_cache_bypass $http_upgrade;
    }
  }
}
upstream apps: Define same as container application container name.
GZIP is a file format that uses DEFLATE internally, along with some interesting blocking, filtering heuristics, a header, and a checksum. In general, the additional blocking and heuristics that GZIP uses give it better compression ratios than DEFLATE alone.
gzip_types: Define types of files for compressed.
Note: I always deploy an environment using IaaC to make my life easier. So, I have developed Terraform code to deploy Fargret ECS (Nginx and App), ALB, Target Group for ALB
Container Definition
 [
    {
        "name": "app-container",
        "secrets": [],
        "image": "Your App ECR URL Here",
        "cpu": 512,
        "memory": 512,
        "portMappings": [
            {
                "containerPort": ${app_port},
                "protocol": "tcp",
                "hostPort": 0
            }
        ],
        "essential": true
    },
    {
        "name": "nginx-container",
        "image": "Your Nginx ECR URL Here",
        "memory": 256,
        "cpu": 256,
        "essential": true,
        "portMappings": [
            {
                "containerPort": ${web_port},
                "protocol": "tcp",
                "hostPort": 0
            }
        ],
        "links": [
            "app-container:app-container"
        ],
        "logConfiguration": {
            "logDriver": "awslogs",
            "secretOptions": null,
            "options": {
                "awslogs-group": "/ecs/nginx-log",
                "awslogs-region": "${region}",
                "awslogs-stream-prefix": "ecs"
            }
        }
    }
]
Main.tf
data "template_file" "template" {
    template = file("./templates/container-definition.json")
    vars = {
        region            = var.AWS_REGION
        app_port          = var.container_port
        web_port          = var.nginx_port
    }
}
As you can see from the main.tf file container ports passed as variables. var.container_port = 3000 and var.nginx_port = 80
Task Definition
resource "aws_ecs_task_definition" "task_definition" {
    container_definitions = data.template_file.template.rendered
    family = "SideCar"
    requires_compatibilities = ["FARGATE"]
    network_mode = "bridge"
    execution_role_arn = "arn:aws:iam::YourAccountID:role/ecsTaskExecutionRole"
    task_role_arn = "arn:aws:iam::YourAccountID:role/ecsTaskExecutionRole"
}
requires_compatibilities = ["FARGATE"] - Define that container deployed as fargrate instance.
execution_role_arn = "arn:aws:iam::YourAccountID:role/ecsTaskExecutionRole" - AWS managed role for Task Execution, Please replay with your AWS Account ID
task_role_arn = "arn:aws:iam::YourAccountID:role/ecsTaskExecutionRole" - AWS managed role for Task Execution, Please replay with your AWS Account ID
ECS Service
resource "aws_ecs_service" "ecs_service" {
  cluster = aws_ecs_cluster.cluster.id
  name = "WebApp"
  task_definition = aws_ecs_task_definition.task_definition.arn
  iam_role = "arn:aws:iam::YourAccountID:role/aws-service-role/ecs.amazonaws.com/AWSServiceRoleForECS"
  load_balancer {
    target_group_arn = aws_alb_target_group.target_group.arn
    container_name = "nginx-container"
    container_port = var.nginx_port
  }
  desired_count = var.desired_count
 lifecycle {
    ignore_changes = [desired_count]
  }
}
iam_role = "arn:aws:iam::YourAccountID:role/aws-service-role/ecs.amazonaws.com/AWSServiceRoleForECS" - AWS managed role for AWS Service, Please replay with your AWS Account ID
cluster = aws_ecs_cluster.cluster.id - I have created aws cluster in terraform file and I have refer to here
load_balancer - I have created Application Load Balancer and map to the Nginx Container port request comes from ALB will be forwarded to the Nginx Container
Load Balancer Listner Rule
resource "aws_alb_listener" "listener" {
    load_balancer_arn = aws_alb.fargate.id
    port              = "80"
    protocol          = "HTTP"
    default_action {
    type             = "forward"
    target_group_arn = aws_alb_target_group.target_group.arn
    }

    condition {
    host_header {
      values = ["webapp.com"]
    }
  }
    condition {
        path_pattern {
        values = var.alb_rule
        }

    }
}
I have added Port 80 Listner to the Application Load Balancer and defined the Listener rule as follows.
When client request like webapp.com or the request path container /api, which will be passed to the Nginx container.
Conclusion
Gzip compresses, reduced hosting charges and brings a better user experience.
CI/CD Jenkins Pipeline With AWS - DevOps - Part 02
Hello Everyone,
In my previous tutorial, I discussed How to deploy the Jenkins Server (Master) and Build server (Node/Slave) on EC2 Instances. Also, I mentioned that I will write how to build a Pipeline and deploy the application. So, this blog is a continuation of the previous tutorial. To read my previous tutorial click the link below
CI/CD Jenkins Pipeline With AWS - DevOps - Part 01
In this tutorial, I will show how to build Pipeline, Connect Github, and Continues Deployment of web application on Elastic Beanstalk.
Let's jump into the tutorial
How to build Pipeline, Connect Github, and Continues Deployment of web application on Elastic Beanstalk.
In this case, I am using GitHub as Version Control System and I going to build and deploy the Node-Js application on ElasticBeantalk.
1. Install NodeJs Plugins on Jenkins
Navigate to Manage Plugins and click on the Available tab. Then Search for NodesJs
Manage Jenkins > Plugin Manager > Install NodeJS plugin.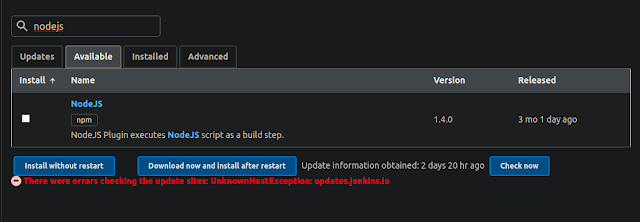
 Now the Plugin is successfully installed.
Now Goto the Global Configuration and Set your compatible node version.
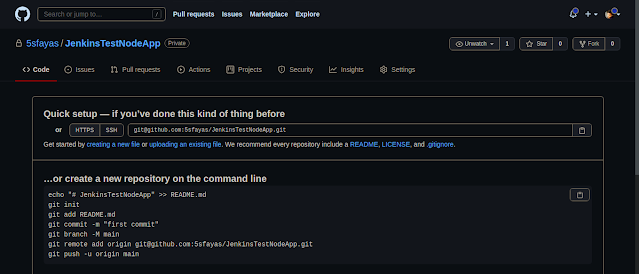
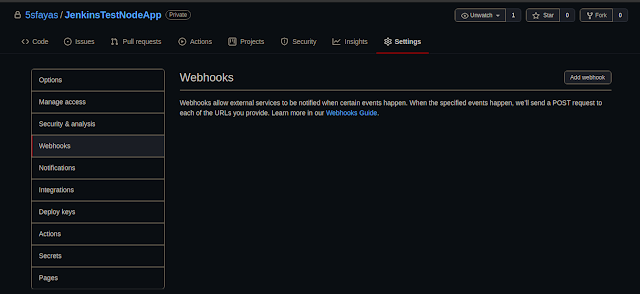
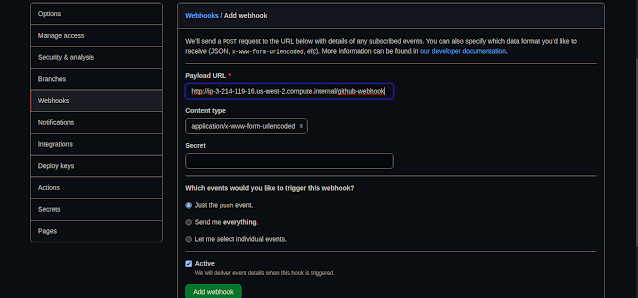 Payload URL: <paste your Jenkins environment URL/github-webhook/>.
 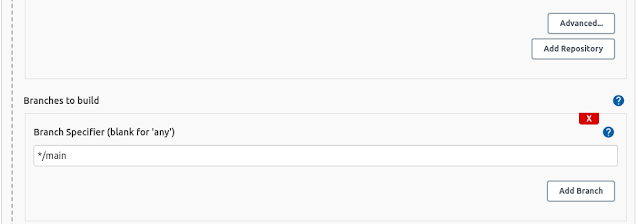 For this project, I am maintaining a master branch and main branch. The master in which where I test my code and later merge my master branch to main. The main branch act as the main/common branch for other branches such as the feature branch, todo branch, etc.
 I select GitHub hook trigger as build trigger. As we configured our GitHub to trigger Jenkins for each pull and push.
 As I mentioned earlier, ElasticBeanstalk stores different versions of the application to the S3 bucket. So let's configure applications for deploy to S3.
CI/CD Jenkins Pipeline With AWS - DevOps - Part 01
Hello Everyone,
As you know, I am reading about AWS services and automate the deployment process of any AWS services using Terraform, Ansible, PowerShell, and bash and also often talk about DevOps.
DevOps is one of the things right now in the term of CI/CD with the development and release of software in the DevOps process. Every development and the release of the software have to be as fast as possible.
So, In this tutorial, show you how the deployment and release of a web application agile as possible using Jenkins, Github, AWS EC2 Instances, and AWS Elastic Beanstalk to create a deployment pipeline for a web application that is updated automatically every time you change your code.
This tutorial Divided into three parts,
In part 01, I will be explaining how to deploy the Jenkins server (master) and Build server (node/slave).
In part 02, I will explain meticulously how to build Pipeline, Connect Github, and Continues Deployment of web application on Elastic Beanstalk.
In part 03, let's have contexts about the Continuous Test, Release Management and App Performance and Monitoring (APM)
----------------------------------------------------------------------------------------------------------
Note: In this tutorial, I won't be explaining VPC, Subnet, Route Table creation. This tutorial only about Jenkins Master/ Slave Installation & Configuration AWS Plattform.
Note: Hit the y key on your keyboard when asked before installation commences.
ubuntu@ip-10.0.0.172:~$ sudo -s
root@@ip-10.0.0.172:-# sudo amazon-linux-extras install java-openjdk11
...
Transaction Summary
======================================
Install  1 Package (+31 Dependent packages)

Total download size: 46 M
Installed size: 183 M
Is this ok [y/d/N]: y
root@@ip-10.0.0.172:~#
root@@ip-10.0.0.172:~#
Once installation is over, Confirm the installation by checking the Java version.
ubuntu@ip-10.0.0.172:~# java --version
openjdk 11.0.7 2020-04-14 LTS
OpenJDK Runtime Environment 18.9 (build 11.0.7+10-LTS)
OpenJDK 64-Bit Server VM 18.9 (build 11.0.7+10-LTS, mixed mode, sharing)
root@@ip-10.0.0.172:~#
Add Jenkins repository to Jenkins Master Instance. we’ll use the package installation method. Therefore a package repository is required to install Jenkins.
root@@ip-10.0.0.172:~# tee /etc/yum.repos.d/jenkins.repo<<EOF
[jenkins]
name=Jenkins
baseurl=http://pkg.jenkins.io/redhat
gpgcheck=0
EOF
Import GPG repository key.
root@@ip-10.0.0.172:~# rpm --import https://jenkins-ci.org/redhat/jenkins-ci.org.keyroot@@ip-10.0.0.172:~# sudo yum repolistroot@@ip-10.0.0.172:~# yum install jenkinsroot@@ip-10.0.0.172:~# systemctl start jenkins
root@@ip-10.0.0.172:~# systemctl enable jenkins
root@@ip-10.0.0.172:~# systemctl status jenkins
● jenkins.service - LSB: Jenkins Automation Server
Loaded: loaded (/etc/rc.d/init.d/jenkins; bad; vendor preset: disabled)
Active: active (running) since Wed 2020-12-09 17:52:04 UTC; 9s ago
Docs: man:systemd-sysv-generator(8)
Process: 2911 ExecStart=/etc/rc.d/init.d/jenkins start (code=exited, status=0/SUCCESS)
CGroup: /system.slice/jenkins.service
└─2932 /etc/alternatives/java -Dcom.sun.akuma.Daemon=daemonized -Djava.awt.headless=true -DJENKINS_HOME=/var/lib/jenkins -jar /usr/lib/jenkins/jenki...
Dec 09 17:52:03 amazon-linux systemd[1]: Starting LSB: Jenkins Automation Server...
Dec 09 17:52:03 amazon-linux runuser[2916]: pam_unix(runuser:session): session opened for user jenkins by (uid=0)
Dec 09 17:52:04 amazon-linux jenkins[2911]: Starting Jenkins [ OK ]
Dec 09 17:52:04 amazon-linux systemd[1]: Started LSB: Jenkins Automation Server.
root@@ip-10.0.0.172:~# ss -tunelp | grep 8080
tcp LISTEN 0 50 *:8080 *:* users:(("java",pid=2932,fd=139)) uid:996 ino:26048 sk:f v6only:0 <->root@@ip-10.0.0.172:~# yum install nginx
root@@ip-10.0.0.172:~# service nginx start
root@@ip-10.0.0.172:~# vim /etc/ngnix/conf.d/jenkins.conf
upstream jenkins {
    server 127.0.0.1:8080;
}

server {
    listen      80 default;
    #server_name your_jenkins_site.com;#

    access_log  /var/log/nginx/jenkins.access.log;
    error_log   /var/log/nginx/jenkins.error.log;

    proxy_buffers 16 64k;
    proxy_buffer_size 128k;

    location / {
        proxy_pass  http://jenkins;
        proxy_next_upstream error timeout invalid_header http_500 http_502 http_503 http_504;
        proxy_redirect off;

        proxy_set_header    Host            $host;
        proxy_set_header    X-Real-IP       $remote_addr;
        proxy_set_header    X-Forwarded-For $proxy_add_x_forwarded_for;
        proxy_set_header    X-Forwarded-Proto http;
    }

}
Once you edit the configuration restart the Nginx
root@@ip-10.0.0.172:~# systemctl reload nginxroot@@ip-10.0.0.172:~# cat /var/lib/jenkins/secrets/initialAdminPassword
7c893b9829dd4ba08244ad77fae9fe4f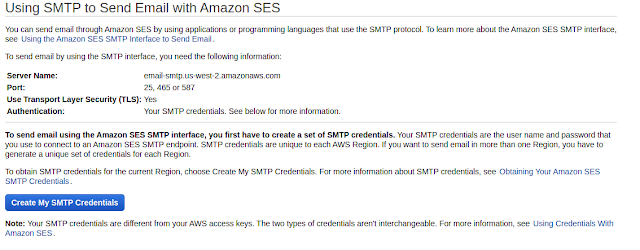
ubuntu@ip-10.0.0.168:~$ sudo -s
root@@ip-10.0.0.168:-# amazon-linux-extras install java-openjdk11root@@ip-10.0.0.168:-# yum -y install gitroot@@ip-10.0.0.168:-# /usr/bin/easy_install awsebcliMyPrivateDNS: ip-10-0-0-168.us-west-2.compute.internal
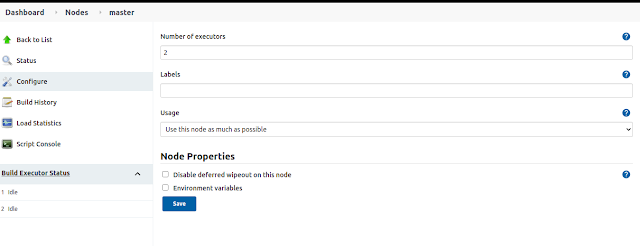 Once you save it, Click on New Node and the Slave instance your worker node to build your application on the Continuous integration. and define the following fields on the menu.


